The most viewed items
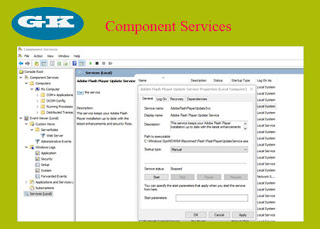
To use component services in Windows:
1.Press Windows and R keys together at the same time. Run Box will be appeared.
2.Type comexp.msc in the run box and click OK. Component services windows will be appeared.
In Event Viewer, we can check all the events in our computer.
In Services, we can start or stop the services. Some of the services start automatically when we turn on our computers. Running so many services at the computer start up time makes our computer slow. So, we need to disable the services we don't need. Some services do not run automatically when we turn on our computers, for example, anti-virus software. At that time, we need to enable the services we need. The following is the way to enable or disable services in windows computer.
1.Click the services in the left pane.
2.Double-click the services you want to enable or disable in the middle pane.
3.You can choose one of Starup Types: Automatic(Delayed Start), Automatic, Manual, Disabled.
4.Click Start or Stop and then, click Apply and OK.
Sometimes, we face the problem that the files or folders in our computers or hard disk or memory sticks are disappeared or hidden. In this kind of case, we can use command prompt to recover those hidden files or folders. The following is the way to recover the hidden files or folders by command prompt in windows OS.
1. Press Window + R keys together. Run Box will be appeared.
2. Type cmd in Run Box.
3. Check your drive is in which drive letter. Step 4 is the way to check drive letter.
4. Press Window + E together. Then you will see your drive is allocated in which drive letter.
5. Lets say your drive is in the drive name E. Type E: in the command prompt and press Enter.
6. Type dir/a and press Enter. (you will see all the files and folders located in your drive).
7. Type attrib -h -s -a -r "hidden file / folder name" and press enter.
8. In this way, you can get back all of your hidden files or folders one by one.
Please look at the following video
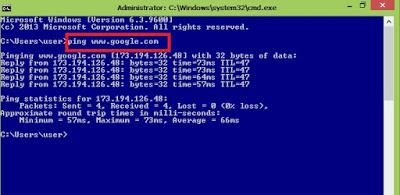
We can use ping command to test network connection. The following is the way to test connection in windows computer.
1. Press windows and R keys together. Run Box will be appeared.
2. Type cmd in the run box. Command Prompt Box will be appeared.
3. Type ping www.google.com or (www.example.com) in the command prompt and press Enter. Mostly, we use google.com to test internet connection.
Then, you will see the network connection status as shown in the below picture.
Sometimes, we need to give ip address to computers manually so that we can manage the users in the network.
Why we need to do so?
For example,in some organizations and firms, although some people are allowed to use everything, some people are not allowed to use YouTube and some people are not allowed to use Facebook for bandwidth management.
By giving ip address to computer manually, you can do bandwidth and traffic management easily. In some routers and access points, you can manage ip address for the users from the routers or access point. In this post, i will tell you how to give ip address to computers manually.
1. Press Windows and R keys together at the same time and run box will be appeared.
2. Type ncpa.cpl in the run box and press Enter. The following windows will be appeared.
3. If you use WiFi, right click the Wi-Fi button and select properties.
If you use cable, right click the Ethernet and select properties.
4. Select Internet Protocol Version 4 (TCP / IP 4) and click proterties.
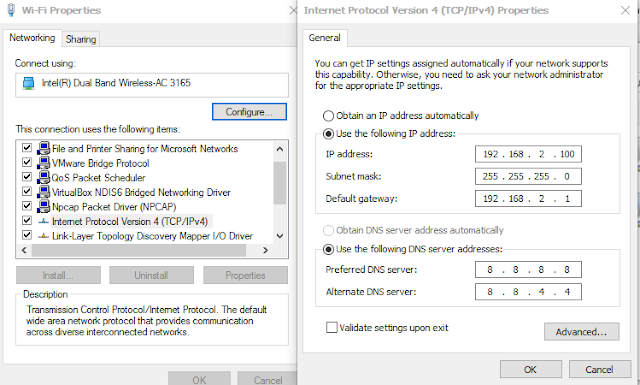
5. Select Use the following IP address option and fill the IP address, Subnet mask, Default gateway and DNS servers and click ok. The below picture is an example
There are various types of Hard Disks. Some of them are:
IDE : Integrated Device Electronic. Known as PATA as well.
PATA : Parallel advance technology attachment
- Mostly found in Desktop computers. But, don't use so much nowadays.
SATA: Serial Advance Technology Attachment
- Used in Laptops, Desktops and Servers.
SAS: Serial Attached SCSI
SCSI: Small Computer System Interface
- Mostly found in Servers.
SSD: Solid State Disk
- Nowadays in most of the computers and servers use, SSD is used.
Cleaning Up Disk in Windows
We can clean up system error memory dump files from hard disk that make computer slow to work. How to clean up?
1. Press Windows and R keys together at the same time. Run box will be appeared
2. Type cleanmgr.exe in the Run Box and click OK
3. Select drive you want to clean up and click OK
4. Select all files or files you want to delete and click OK
5. And then, click Delete Files
Checking Disk
We can use windows command to check disks in computer. How to check?
1. Go to command prompt
2. Press Right Click and click Run As Administrator
3. Type chkdsk in the command prompt and press Enter
Then, system will check the disk.
Please click here for more details.
Using Disk Management
We can create new partitions, delete partitions and change drive names by using disk management in windows. How to use disk management?
1. Press Windows and R Keys together at the same time. Run Box will be appeared
2. Type diskmgmt.msc in the Run Box and click OK
Then, we can manage the disks.
How to create new partitions / volumes
1. Select the drive you want to make partition
2. Press Right Click and click Shrink Volume
3. Enter the amount of space we want to create for new partition
4. Click Shrink and wait a moment
5. The unallocated space will be appeared and select it
6. Press Right Click and click New Simple Volume
7. Click Next and Next again.
8. Choose Drive Letter(D, E, F) and click Next
9. Choose File System(FAT, NTFS) and give name to the volume/partition in the Volume label
10. Click Next and Finish.
Now, we've successfully created new volume/partition.
How to delete volumes / partitions
1. Right click the partition you want to delete and click Delete.
Mostly we need to create user accounts for file sharing. But, in some organizations or farms, two or more users use in the same computer. At the time, we also need to create user accounts for security reasons. In some organizations or farms, the users are not allowed to use admin right. Without admin right, you can't install or uninstall any software and can't change any system setting. So, the users can be managed easily by creating user accounts in windows. The following is how to create user accounts in windows:
1. Press Windows and R keys together at the same time and the run box will be appeared.
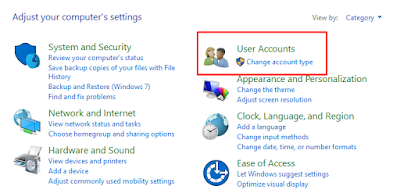
2. Type control in the run box and the following screen will be appeared.
3. Click User Accounts and User Accounts again.
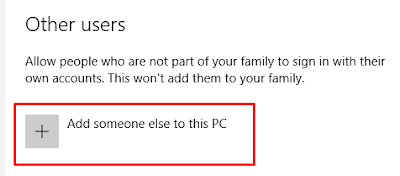
4. Click Manage another account and click add a new user in pc settings.
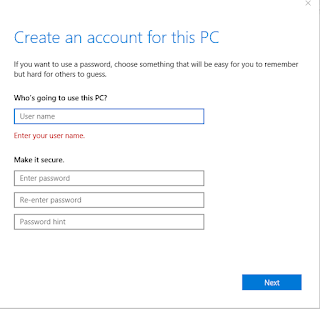
5. As shown in above picture, click Add someone else to this PC and the following box will be appeared.
6. Fill User name and Password and click Next and you've successfully created user account.
7. As shown in above picture, click Change account type if you want to change account type.
8. There are two type of accounts: Standard user and Administrator. Standard user can't install or uninstall any software and can't change any system settings though the administrator account can do all.
1. Insert your usb disk into your computer.
2. Press Windows + R keys together.
3. Type cmd in the run box and click Ok.
4. Type diskpart in the command prompt and press enter.
5. Click Yes when the User Access Control Box is appeared.
6. Type list disk in the command prompt.
7. You will see the disks.
8. Type select disk 1 or 2 or something (choose the usb disk number you want to make bootable).
9. Type clean in the command prompt.
10. Type create partition primary.
11. Type select partition 1.
12. Type active.
13. Type format fs = ntfs . (Wait until the format completes)
14. Type assign .
15. Copy the Windows files and past those into the usb drive.
16. Now you can use this usb as a bootable drive .
1. Press windows and R keys together at the same time.
2. The run box will be appeared and type cmd in it and press enter.
3. The command prompt box will be appeared and type ipconfig /all in it and press enter.
4. And then, the following screen will be appeared.
5. You will see the IPv4 Address, Subnet Mask, Default Gateway and DNS servers as shown in the above picture.
6. You need to take care ip address of each pc not to be conflicted in your local network, and subnet mask, default gateway and dns servers are not to be wrong.
7. If something is wrong in one of the above conditions, you will not get internet connection.
8. If you don't get internet connection though all of the above conditions are correct, it may be because of your ISP or something is wrong in router or switch or access point or your pc is not allowed to use internet by network administrator.
(Note: the above picture is just an example, the facts of you and me will not be same)
Sometimes, we need to change user account password in windows because of different kinds of reasons. The following is the way to change user account password in windows:
1. Press Windows and R keys together at the same time and the run box will be appeared.
2. Type control in the run box and click ok. The control panel screen will be appeared.
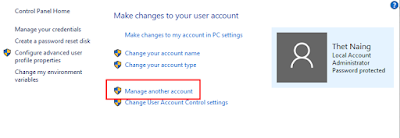
3. Click User Accounts and then click User Accounts again. The following screen will be appeared.
4. As show in above picture, click Manage Another Account and the following screen will be appeared.
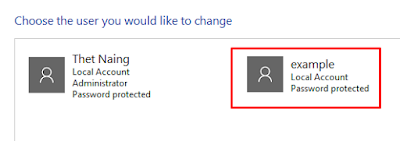
5. Click the User Account you want to change password and the following screen will be appeared.
6. As shown in above picture, you can change the account name, the password, the account type, and can also delete the account you've created.
Sometimes, we may face the problem that the computer screen is bigger or smaller than normal although all drivers have been installed. That may be because of screen resolution in our computers. The following is the way how to change screen resolution in windows 10 :
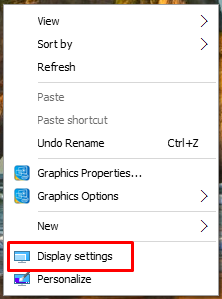
1. Right click on the windows screen and click display settings as shown in below picture.
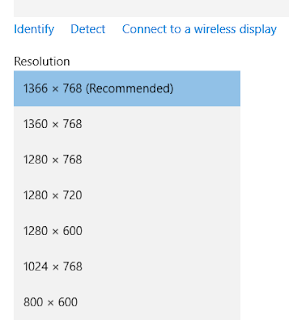
2. Click down arrow head under Display resolution and the following screen will be appeared.
3. Choose the resolution that is compatible with your computer as show in above picture and click Apply.
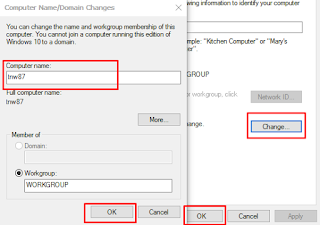
According to the requirement of the network administration, we need to change computer name when there are two or more computers are in the same name. The following is the way how to change computer name in windows:
1. Right click this pc or computer and click properties. The following screen will be appeared.
2. As shown in above picture, click Change settings and the following screen will be appeared.
3. As show in above picture, click change and type the name you want to change in the computer name box. And then, click ok.
4. Restart your computer so that the changes will be effected.
Freemake Video Downloader is one of the best open source Video Downloader. By using Freemake Video Downloader, you can download Video from round about 10,000 sites such as Youtube, Facebook, Vimeo and Dailymotion.
If you want the offline installer, please click here to download.