The most viewed posts

About Desktop Icons in Windows Computer

How to clean up Windows Computer

Driver Booster

CCleaner

Advanced System Care

Myanmar font and keyboard for Windows

Registry Reviver

How to make a computer secure and run faster

some (JavaScript Array Method)

Terms and Conditions

The most viewed items

Desktop Hard Disk

HP ProBook 430

Dell Inspiron 5559

External Hard Disk

Laptop RAM

SONY Playstation Portable

Laptop

ZilaStar ICT May 29 2019, 18:26:18

Creating first php file in Ubuntu

We need Apache Service to run php codes. Now, I hope you've already installed Apache Service in your Ubuntu PC. If you have not installed it, please click here. Then, follow the below steps.

1. Click Open Folder Location.

2. Double click htdoc.

3. Right Click in htdoc and Click Open In Terminal.

4. Type nano in the Terminal and press Enter. And then, type the following php codes.


ZilaStar ICT May 29 2019, 15:37:48

Installing Xampp in Ubuntu 18.04

1. Click here to download the Xampp Software for Ubuntu.

2. Open new terminal and type cd Downloads in it and press Enter.

3. Type sudo chmod +x xampp-linux-x64-7.3.0-0-installer.run and press Enter.

4. Type sudo ./xampp-linux-x64-7.3.0-0-installer.run and press Enter.

Now, you've successfully installed the Xampp in Ubuntu. To open Xampp, type the following command in the terminal.

sudo /opt/lampp/manager-linux-x64.run and press Enter. Then, the following welcome page will be appeared.


Go to Manage Servers and start MySQL Database and Apache Web Server.

To check Apache Web Server,

Open Web Browser and type localhost in it and press Enter. Then, you will see the following welcome page.

To check MySQL Service,

Type localhost/phpmyadmin/ in the browser and press Enter. Then, you will see the following welcome page.


ZilaStar ICT May 28 2019, 14:30:59

Installing php 7.0 in Ubuntu

Installing php 7.0

sudo apt-get install php7.0

To search php extensions

apt-cache search php7.*

Then, you can install php extensions upon the services you need.


ZilaStar ICT May 28 2019, 17:39:41

Installing MySql in Ubuntu

The followings are the commands to install MySql in Ubuntu.

1. Open new terminal and type sudo su in it.

2. Type apt-get install mysql-server php7.0-mysql and press Enter.

3. Type systemctl status mysql and press Enter. (Checking MySql service working or not)

4. Type systemctl enabel mysql and press Enter. (Enabling MySql service)

5. Type systemctl start mysql and press Enter. (Starting MySql Service)

6. Type mysql_secure_installation and press Enter. (Give Username, Password and follow the procedure)

7. Type mysql -u root -p and press Enter.(Log In MySql)


ZilaStar ICT May 28 2019, 14:40:02

Installing Apache Service in Ubuntu

1. Open new terminal and then, we better type sudo su and press Enter for admin persmission before typing any command.

2. Type apt-get install apahce2 libapache2-mod-php and press Enter.

3. And then, type systemctl status apache2 to check if the apache service is running or not.

4. If the apache service is not running, type systemctl enable apache2 and press Enter, and then, systemctl start apache2 and presse Enter.

5. Open the browser and type localhost in it. Then you will see the following welcome page.


ZilaStar ICT May 27 2019, 20:11:11

Using Network Discovery Tool (Nmap) in Ubuntu

Nmap is one of open source network discovery tools. In Nmap, there are so many features such as Target Specification, Host Discovery, Scan Techniques, etc,... . We can also check website is up or down by using Nmap. In this example, I'l tell you some functions under Host Discovery.


How to install Nmap in Ubuntu
Open a new terminal and type sudo apt-get install nmap in it. Wait a moment until the software is successfully installed.


1. Using List Scan (-sL)

Open new terminal and type nmap -sL domain name (eg. nmap -sL tnw87.com) in it. Then you will see ip address of 'tnw87.com'. If you don't see, your domain is errored in something.


2. Using Ping Scan (-sn)

Open new terminal and type nmap -sn domain name (eg. nmap -sn tnw87.com) in it. Then, you will see '1 IP address / 1 Host is up'. If you don't see, your domain is errored in something.


3. Treat all hosts as online (-Pn)

Open new terminal and type nmap -Pn domain name (eg. nmap -Pn tnw87.com) in it. Then, you will see '1 IP address / 1 Host is up'. And the services of http, https, http-proxy, https-alt are needed to be in open state. You don't see those conditions, your website is errored in something.

There are still so many features in Nmap. Open new terminal and type nmap in it and press enter. Then, you will see so many features. You can try those yourself.


ZilaStar ICT May 27 2019, 13:52:46

Using Viber in Ubuntu

1. Click here and download Viber for Ubuntu. (Every file we download in Ubunt is saved in Download Page)

2. Copy or Cut downloaded file and paste in Home Page.

3. Open new terminal and type the following commands.

      ls ~/viber.

     sudo apt-mark hold libcurl3

     sudo dpkg -i --ignore-depends=libcurl4  ~/viber.deb

     sudo apt install -f

     sudo dpkg -i --ignore-depends=libcurl4 ~/viber.deb

     sudo apt-mark unhold libcurl3

    /opt/viber/Viber

4. Now you can start use viber in Ubuntu.


ZilaStar ICT May 26 2019, 21:06:48

Screenshot Software for Ubuntu

Shutter is one of open source screenshot software for Ubuntu. It is not bad to use. In this software, you can use many features to do capture ,and can edit as well.
 

How to install

Open terminal and type the following command in it.
- sudo apt install shutter

How to open shutter
Open new terminal and type shutter in it and then, the shutter will be opened.

It is the good habit to run the following commands before installing any software in Ubuntu.

- sudo apt-get update

- sudo apt-get upgrade


ZilaStar ICT May 26 2019, 11:52:57

Installing Ubuntu in Virtual Box

Virtualization

Virtualizatin is installing two or more operating systems in one physical machine. The main effects of using virtualizaton are security and cost saving. Oracle VirtualBox is one of virtualization softwares. It is open source software and totally free. Please click here to download.  Install it after downloading.


Ubuntu

Ubuntu is one of open source operating systems. Please click here to download ubuntu ISO file.

Installing Ubuntu in VirtualBox

1. Start VirtualBox


- Open VirtualBox and Click New.


2.Choose Name and Operating System


- Type name in the Name box (for example, T N W)

- Choose operating system in Type box (here we will choose Linux)

- Chose version in Version box (here I will choose Ubuntu-64 bit)

- And then click Next.


3.Select Memory Size (RAM)


- Here I will give 4GB (4096MB) to the virtual machine

- Click Next.


4.Creating Virtual Hard Disk

- Choose Create a virtual hard disk now

- Choose VDI and click Next

- Choose Dynamically allocated and click Next


5. Selecting File location and size


- Choose the size of virtual hard disk

- Click create


6. Starting Virtual Machine


- Click start


- Browse the Ubuntu ISO file you've downloaded.

- Click Start again.

- Select Language and click Install Ubuntu

- Click continue.

- Select Erase disk and install Ubuntu because there is noting in Virtual Hard Disk you've created.

- Click Install Now.

- Click continue.

- Choose location and click continue

- Select Keyboard Layout and click continue


- Fill Your Name and Secured Password

- Click Continue

- Now the machine is installing Ubuntu OS and it will take some time to complete.

- Click Reatart Now

- Press Enter


- Now your installation is complete and enter password to login


ZilaStar ICT May 21 2019, 15:56:05

Checking the security of our Emails

https://haveibeenpwned.com is one of the best website to check the security of our emails. To check email security,

1. Type your email address in the email address box and click pwned?.

2. Then, you will see the result of your email.


ZilaStar ICT May 20 2019, 16:10:38

How to add Gmail into Microsoft Outlook

Before adding Gmail account into Microsoft Outlook, you need to change some settings in Gmail. 

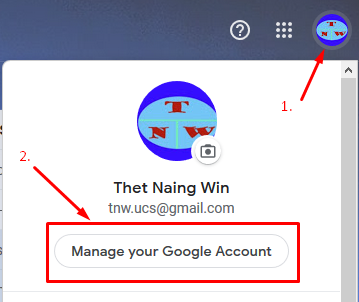
1. As shown in the above picture, click Gmail account and click Manage your Google Account again.


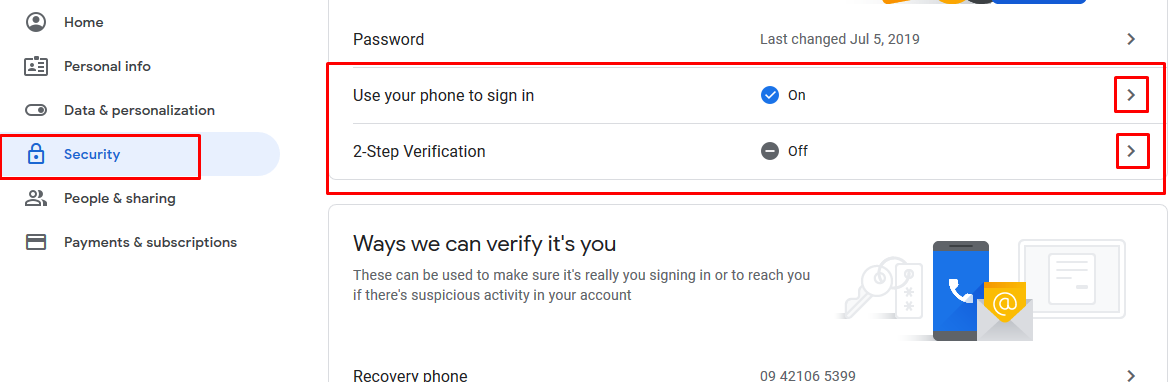
2. As shown in the above picture, click Security and turn off 2-Step Verification if you've turned on it.


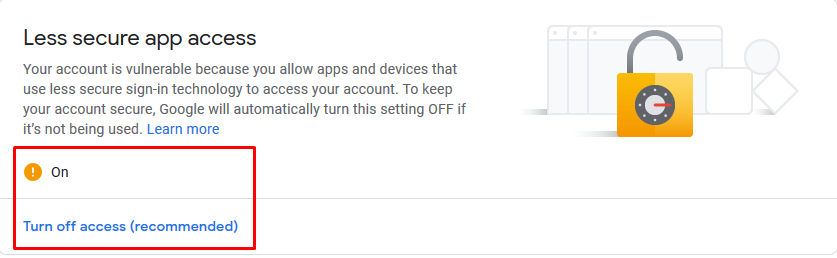
3. As shown in the above picture, turn on Less secure app access. 


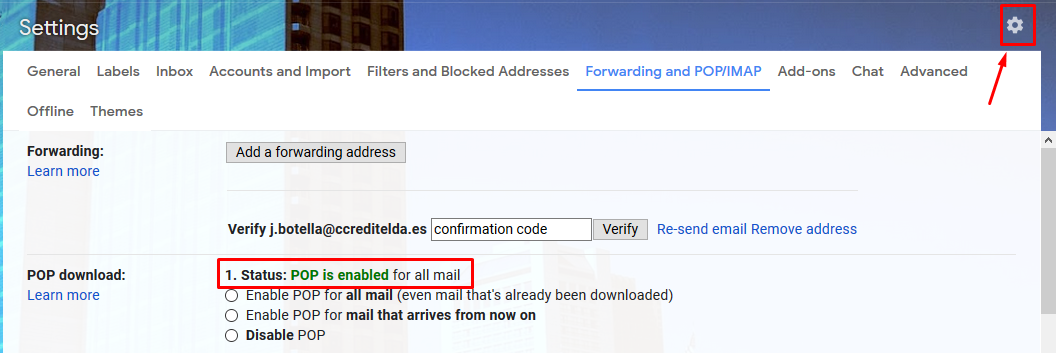
4. As shown in the above picture, click settings and click settings again. Choose Enable POP and click Save Changes.


5. Open Microsoft outlook application and choose Manual setup or additional server types as shown in the above picture. Click Next.


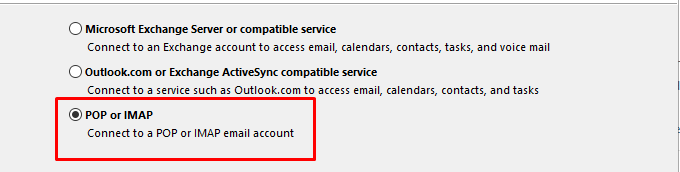
6. Choose POP or IMAP as shown in the above picture. And then, click Next.


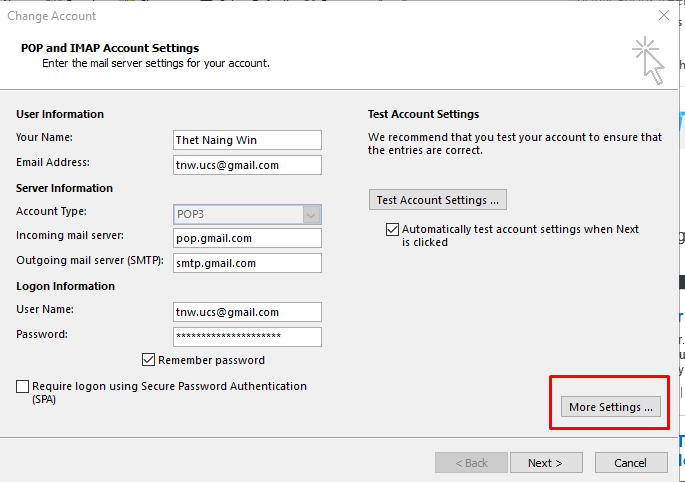
7. As shown in the above picture, Fill Your Name, Your Email Address, Incoming Server, Outgoing Server, Username and Password. And then, click More Settings.


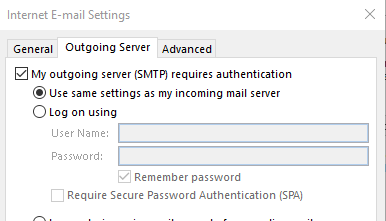
8. As shown in the above picture, select My outgoing server (SMTP) requires authentication and Use same setting as my incoming server under Outgoing Server Tab. And then click Advanced.


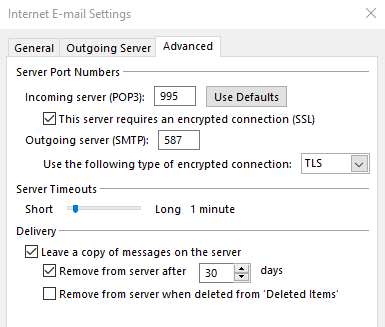
9. Fill all the fields as shown in the above picture and click Ok.


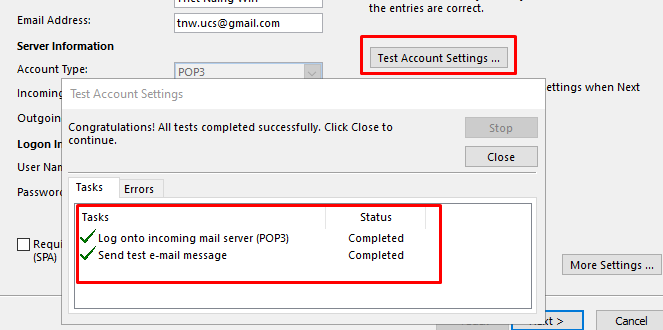
10. As shown in the above picture, click Test Account Settings. And then you will see it works properly. Click Close and Click Next. You will see the above picture again. Click Close and click Finish. Now you can use your gmail account in Microsoft Outlook.


ZilaStar ICT May 18 2019, 11:38:52

How to use Gmail securely

Sometimes, we may click the links sent by hackers and type the username and password. The hackers already know your username and password as soon as you type the username and password in the faked sites. To prevent such kind of case, you can use the following methods:

1. Use Your phone to sign in

Even if the hackers know your username and password, they still can't sign in to your account. Every time they sign in, Google will send notification to your phone. As long as you don't allow, they can't sign in.


2. Two Step Verification 

Every time the hackers sing in to your account or you sing in to new devices, Google will send you the six digit verification code to your phone. Even if other people know your username and password, they can't log in to your account without knowing the six digit verification code sent to your phone.


How to configure 

1. Sign in to your Gmail Account.


2. As shown in the above picture, click the User Account and click Manage your Google Account again.


3. As shown the above picture, click the Security and click again the one you want to configure and follow the instructions.


Page : 20 of 30
To Contact
Available Services
Terms and Conditions