The most viewed items
Network Protocols are machine languages used to communicate the devices on the network. For devices to communicate on a network, they must follow different protocols that perform the many tasks to be complicated. The protocols define the followings:
- The format of the message, such as how much data to put into each segment
- The way intermediary devices share information about the path to the destination
- The method to handle update messages between intermediary devices
- The process to initiate and terminate communications between hosts
The examples of Network Protocols are as follows:
Hypertext Transfer Protocol (HTTP): HTTP is a common protocol that controls the way that a web server and web client interact.
Transport Protocol: Transmission Control Protocol (TCP) is the transport protocol that manages the individual conversions between a web server and web client. TCP divides the HTTP messages into smaller pieces, called segment, to be sent to the destination client. It also controls the size and rate of messages exchanged between the server and the client.
Internet Protocol (IP): IP takes the formatted segments from TCP, encapsulates them into packets, assign the appropriate addresses, and select the best path to the destination client.
Network Access Protocols: Network access protocols describe two primary functions: data-link management and the physical transmission of data on the media. Data-link management protocols take the packets from IP and format them to be transmitted over the media. The physical media controls how the signals are sent over the media and how they are interpreted by the receiving clients.
OSI Model
The Open System Interconnection (OSI) Model provides an abstract description of the network communication process. International Organization for Standard (ISO) develops it to provide a road map for non-proprietary protocol development. The OSI model is just a reference model and many of OSI protocols are no longer in use. There are seven layers in OSI Model. Those are as follows:
Layer 7 - Application
Performs services for the application used by the end users.
Layer 6 - Presentation
Provides data format information to the application.
Layer 5 - Session
Manages session between users.
Layer 4 - Transport
Defines data segments and numbers them at the source, transfers the data, and reassembles the data at the destination.
Layer 3 - Network
Creates and addresses packets for end-to-end delivery through intermediary devices in other network.
Layer 2 - Data Link
Creates and addresses frames for host-to-host delivery on the local LANs and between WAN devices.
Layer 1 - Physical
Transmits binary data over media between devices. Physical layer protocols define media specifications.
TCP/IP Model
TCP / IP is an open standard. The rules and implementation of the TCP/IP model were cooperatively developed by members of the industry using Request for Comments (RFC) documents. There are four layers in TCP/IP Model. Those are as follows:
Layer 4 - Application
Represents application data to the user.
Layer 3 - Transport
Supports communication between devices and performs error correction.
Layer 2 - Internet
Finds the best path through the network.
Layer 1 - Network access
Controls hardware devices and media.
Comparison of OSI and TCP / IP Model
7. Application | 4. Application |
6. Presentation |
|
5. Session |
|
4. Transport |
3. Transport |
3. Network | 2. Internet |
2. Data Link | 1. Network Access |
1. Physical |
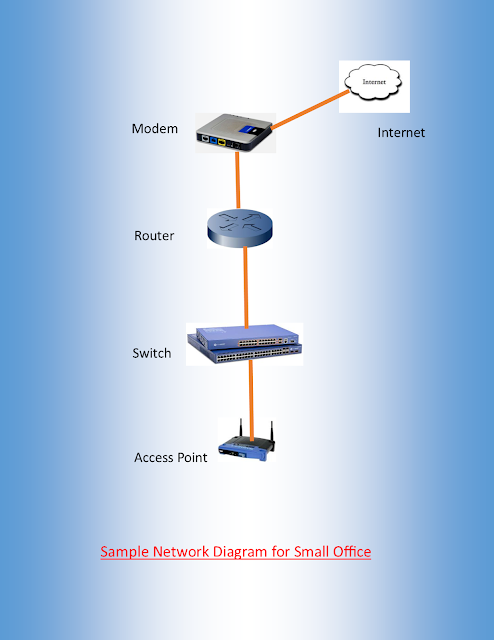
Access Point
Normally, the access points allow the users to connect the Internet through the Wired Network(Switch, Router, Modem, etc....).
Switches
The switch (layer 2) normally receive the packets, process it and forward data to the destination.
Routers
Normally, the router is used to connect the different networks. But there are so many router functions if detailed.
Modem
The Modem is the common networking device that turns the digital data of an electronic device into modulated electrical signal for transmission over telephone lines and demodulated by another modem at the receiver side to recover the digital data.
Internet
The Internet is the global system of interconnected computer networks that use the Internet Protocol Suite (TCP/IP) to link billions of devices worldwide.
Desktop Computer
A common computer used in a home or offices.
Laptop
A portable computer.
LAN Media
Local-area network media, usually copper cable.
Wireless Media
Depicts local-area network wireless access.
Switch
The most common devices for interconnecting local-area networks
Router
A device that helps direct message between networks
Firewall
A device that provides security of network.
Server
A common computer dedicated to provide application services to end users on a network. Server stores information to share with its clients.
Cloud
A group of networking devices out of local management control, often the Internet itself.
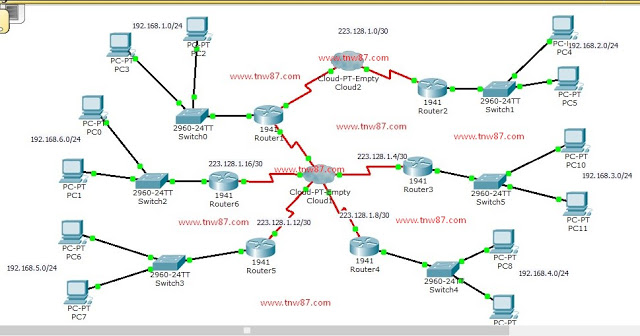
The example of how to configure the Frame Relay in Cisco Networking Devices is shown in the below with the picture together. I hope this example will be benefit for brothers and sisters who are learning Cisco Networking.
Router 1
en
config t
hostname R1
int g0/0
ip address 192.168.1.1 255.255.255.0
no shut
int s0/0/0
description Link From Router1 to Router2
ip address 223.128.1.1 255.255.255.252
encap frame-relay
frame-relay lmi-type cisco
frame-relay interface-dlci 101
no shut
int s0/0/1
encap frame-relay
no shut
exit
int s0/0/1.201 point-to-point
description Link From R1 to R3
ip address 223.128.1.5 255.255.255.252
frame-relay interface-dlci 201
no shut
exit
int s0/0/1.301 point-to-point
description Link From R1 to R4
ip address 223.128.1.9 255.255.255.252
frame-relay interface-dlci 301
no shut
exit
int s0/0/1.401 point-to-point
description Link From R1 to R5
ip address 223.128.1.13 255.255.255.252
frame-relay interface-dlci 401
no shut
exit
int s0/0/1.501 point-to-point
description Link From R1 to R6
ip address 223.128.1.17 255.255.255.252
frame-relay interface-dlci 501
no shut
exit
router rip
version 2
network 192.168.1.0
network 223.128.1.0
network 223.128.1.4
network 223.128.1.8
network 223.128.1.12
network 223.128.1.16
end
copy run start
Router 2
en
config t
hostname R1
int g0/0
ip address 192.168.2.1 255.255.255.0
no shut
int s0/0/0
description Router2 to Router1
ip address 223.128.1.2 255.255.255.252
encap frame-relay
frame-relay lmi-type cisco
frame-relay interface-dlci 102
no shut
exit
router rip
version 2
network 192.168.2.0
network 223.128.1.0
end
copy run start
Router 3
en
config t
hostname R3
int g0/0
description Link From Router3 to Router1
ip address 192.168.3.1 255.255.255.0
no shut
int s0/1/0
description Link From Router3 to Router1
ip address 223.128.1.6 255.255.255.252
encap frame-relay
frame-relay lmi-type cisco
frame-relay interface-dlci 103
no shut
exit
router rip
version 2
network 192.168.3.0
network 223.128.1.4
end
copy run start
Router 4
en
config t
hostname R4
int g0/0
ip address 192.168.4.1 255.255.255.0
no shut
int s0/1/0
description Link From R4 to R1
ip address 223.128.1.10 255.255.255.252
encap frame-relay
frame-relay lmi-type cisco
frame-relay interface-dlci 104
no shut
exit
router rip
version 2
network 192.168.4.0
network 223.128.1.8
end
copy run start
Router 5
en
config t
hostname R5
int g0/0
ip address 192.168.5.1 255.255.255.0
no shut
int s0/0/0
description Link From Router5 to Router1
ip address 223.128.1.14 255.255.255.252
encap frame-relay
frame-relay lmi-type cisco
frame-relay interface-dlci 105
no shut
exit
router rip
version 2
network 192.168.5.0
network 223.128.1.12
end
copy run start
Router 6
en
config t
hostname R6
int g0/0
ip address 192.168.6.1 255.255.255.0
no shut
int s0/1/0
description Link From Router6 to Router1
ip address 223.128.1.18 255.255.255.252
encap frame-relay
frame-relay lmi-type cisco
frame-relay interface-dlci 106
no shut
exit
router rip
version 2
network 192.168.6.0
network 223.128.1.16
end
copy run start
***Thank You***
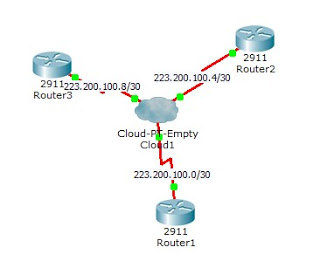
The example of how to configure the Frame Relay in Cisco Networking Devices is shown in the below with the picture together. I hope this example will be benefit for brothers and sisters who are learning Cisco Networking.
Router1
en
config t
hostname Router1
int s0/0/0
encap frame-relay
no shut
exit
int s0/0/0.102 point-to-point
description Link From Router1 to Router2
ip address 223.200.100.5 255.255.255.252
frame-relay interface-dlci 102
no shut
exit
int s0/0/0.103 point-to-point
description Link From Router1 to Router3
ip address 223.200.100.9 255.255.255.252
frame-relay interface-dlci 103
no shut
exit
router rip
version 2
network 223.200.100.4
network 223.200.100.8
end
copy run start
Router2
en
config t
hostname Router2
int s0/0/0
description Link from Router2 to Router1
ip address 223.200.100.6 255.255.255.252
encap frame-relay
frame-relay lmi-type cisco
frame-relay interface-dlci 202
no shut
exit
router rip
version 2
network 223.200.100.4
network 223.200.100.8
end
copy run start
Router3
en
config t
hostname Router3
int s0/0/0
description Link from Router3 to Router1
ip address 223.200.100.10 255.255.255.252
encap frame-relay
frame-relay lmi-type cisco
frame-relay interface-dlci 303
no shut
exit
router rip
version 2
network 223.200.100.4
network 223.200.100.8
end
copy run start
You can see how to configure frame relay in cloud. We will set dlci number in each serial port and link to corresponding routers.
If you want to do testing in Cisco packet tracer, please click here to download packet tracer file.
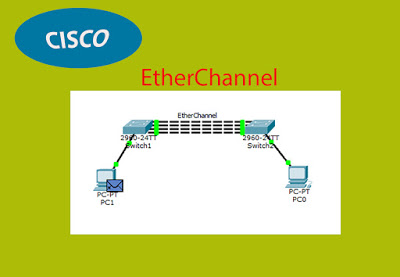
EtherChannel is a combination of two or more physical ports into one logical or virtual port in the switches for redundancy or bandwidth requirements.
The example of how to configure the EtherChannel in Cisco Switches is shown in the below with the picture together. I hope this example will be benefit for brothers and sisters who are learning Cisco Networking.
Switch1
Step 1 : Give Name to Switch 1
en
config t
hostname IT
Step 2 : Create VLan and give name to it
vlan 20
name IT
exit
Step 3 : Create Etherchannel
interface range f0/1 - 4
switchport mode access
switchport access vlan 20
channel-group 5 mode auto
end
Step 4 : Activate the connection to the PC
config t
interface f0/5
no shut
end
Step 5 : Save Configuration
copy run start
Switch 2
Step 1 : Give Name to Switch 2
en
config t
hostname HR
Step 2 : Create VLan and give name to it
vlan 20
name IT
exit
Step 3 : Create Etherchannel
interface range f0/1 - 4
switchport mode access
switchport access vlan 20
channel-group 5 mode auto
end
Step 4 : Activate the connection to the PC
config t
interface f0/5
no shut
end
Step 5 : Save Configuration
copy run start
Please click here to download Packet Tracer Configuration file to do testing.
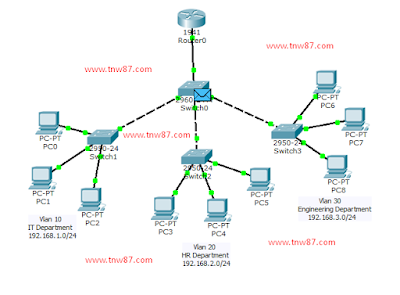
VLan is virtual local area network. It is mostly used to manage the hosts in the network. The example of how to configure VLan in Cisco Networking Devices is shown in the below with the picture together. I hope this example will be benefit for brothers and sisters who are learning Cisco Networking.
Switch 0
Creating VLan
en
config t
hostname tnw87.com
vlan 10
name IT_Department
vlan 20
name HR_Department
vlan 30
name Engineering_Department
end
Checking VLan (VLan we've created is working or not)
show vlan brief
Define Switch Ports
config t
int f0/1
no shut
switchport mode trunk
exit
int f0/2
no shut
switchport mode access
switchport access vlan 10
exit
int f0/3
no shut
switchport mode access
switchport access vlan 20
exit
int f0/4
no shut
switchport mode access
switchport access vlan 30
end
Save Configuration
copy run start
Router 0
en
config t
hostname tnw87.com
int g0/0
no shut
int g0/0.1
encapsulation dot1Q 10
ip address 192.168.1.1 255.255.255.0
no shut
exit
int g0/0.2
encapsulation dot1Q 20
ip address 192.168.2.1 255.255.255.0
no shut
exit
int g0/0.3
encapsulation dot1Q 30
ip address 192.168.3.1 255.255.255.0
no shut
exit
router rip
version 2
network 192.168.1.0
network 192.168.2.0
network 192.168.3.0
end
copy run start
If you want to do testing VLan configuration in packet tracer, please click here to download VLan.pkt.
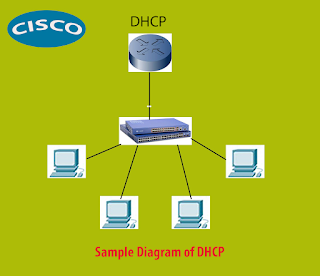
DHCP is a dynamic host configuration protocol. We don't need to manually set IP address to the hosts in the local network by configuring DHCP in the routers. The router will automatically set by itself. The example of how to configure DHCP in Cisco IOS Router is shown in the below with the picture together. I hope this example will be benefit for brothers and sisters who are learning Cisco Networking.
Router
en
config t
int g0/0
ip address 192.168.1.1 255.255.255.0
no shut
exit
ip dhcp pool Test
network 192.168.1.0 255.255.255.0
default-router 192.168.1.1
dns-server 192.168.1.1
end
copy run start
If you want to see sample configuration in packet tracer, you can download pkt file. Click here to download.
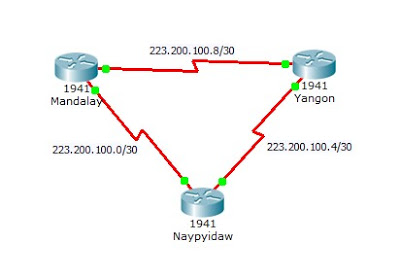
PPP is Point-to-Point Protocol and it is a Wide Area Network (WAN) Technology. The example of how to configure PPP (PAP) in Cisco IOS Routers is shown in the below with the picture together. I hope this example will be benefit for brothers and sisters who are learning Cisco Networking.
Mandalay Router
en
config t
username Mandalay password Mandalay
hostname Mandalay
int s0/0/0
ip address 223.200.100.1 255.255.255.252
no shut
encap ppp
ppp authentication pap
ppp pap sent-username Naypyidaw password Naypyidaw
exit
int s0/0/1
ip address 223.200.100.9 255.255.255.252
no shut
encap ppp
ppp authentication pap
ppp pap sent-username Yangon password Yangon
exit
router rip
version 2
network 223.200.100.0
end
copy run start
Naypyidaw Router
en
config t
username Naypyidaw password Naypyidaw
hostname Naypyidaw
int s0/0/0
ip address 223.200.100.2 255.255.255.252
no shut
encap ppp
ppp authentication pap
ppp pap sent-username Mandalay password Mandalay
exit
int s0/0/1
ip address 223.200.100.5 255.255.255.252
no shut
encap ppp
ppp auth pap
ppp pap sent-username Yangon password Yangon
exit
router rip
version 2
network 223.200.100.0
network 223.200.100.4
end
copy run start
Yangon Router
en
config t
username Yangon password Yangon
hostname Yagngon
int s0/0/1
ip address 223.200.100.6 255.255.255.252
no shut
encap ppp
ppp auth pap
ppp pap sent-username Naypyidaw password Naypyidaw
exit
int s0/0/0
ip address 223.200.100.10 255.255.255.252
no shut
encap ppp
ppp auth pap
ppp pap sent-username Mandalay password Mandalay
router rip
version 2
network 223.200.100.4
end
copy run start
If you want to do testing of this configuration in Packet Tracer, please click here to download pkt file.
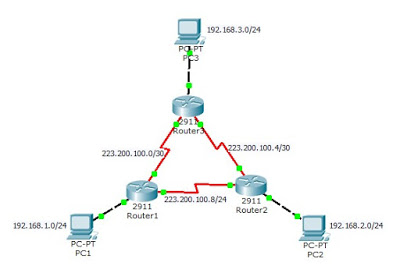
OSPF is Open Shortest Path First and it is a link state routing protocol. The example of how to configure OSPF in Cisco IOS Routers is shown in the below with the picture together. I hope this example will be benefit for brothers and sisters who are learning Cisco Networking.
Router 1
Activate the connection to PC1
en
config t
int g0/0
ip address 192.168.1.1 255.255.255.0
no shut
Activate the connection to Router2
int s0/0/1
ip address 223.200.100.9 255.255.255.252
clock rate 64000
no shut
Activate the connection to Router 3
int s0/0/0
ip address 223.200.100.1 255.255.255.252
no shut
exit
Configure OSPF
router ospf 10
network 192.168.1.0 0.0.0.255 area 0
network 223.200.100.0 0.0.0.3 area 0
network 223.200.100.8 0.0.0.3 area 0
end
Save the configuration
copy run start
Router 2
Activate the connection to PC2
en
config t
int g0/0
ip address 192.168.2.1 255.255.255.0
no shut
Activate the connection to Router 1
int s0/0/1
ip address 223.200.100.10 255.255.255.252
no shut
Activate the connection to Router 3
int s0/0/0
ip address 223.200.100.6 255.255.255.252
no shut
exit
Configure OSPF
router ospf 10
network 192.168.2.0 0.0.0.255 area 0
network 223.200.100.8 0.0.0.3 area 0
network 223.200.100.4 0.0.0.3 area 0
end
Save the configuration
copy run start
Router 3
Activate the connection to PC3
en
config t
int g0/0
ip address 192.168.3.1 255.255.255.0
no shut
Activate the connection to Router 1
int s0/0/0
ip address 223.200.100.2 255.255.255.252
clock rate 64000
no shut
Activate the connection to Router 2
int s0/0/1
ip address 223.200.100.5 255.255.255.252
clock rate 64000
no shut
exit
Configure OSPF
router ospf 10
network 192.168.3.0 0.0.0.255 area 0
network 223.200.100.0 0.0.0.3 area 0
network 223.200.100.4 0.0.0.3 area 0
end
Save the configuration
copy run start
If you want to do testing in Packet Tracer, please click here to download .pkt file.
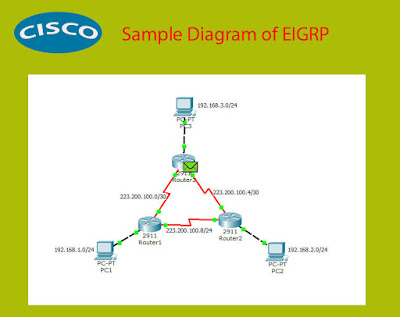
EIGRP is Enhanced Interior Gateway Routing Protocol and it is an advanced distance vector routing protocol. The example of how to configure EIGRP in Cisco IOS Routers is shown in the below with the picture together. I hope this example will be benefit for brothers and sisters who are learning Cisco Networking.
Router 1
Activate the connection to PC1
en
config t
int g0/0
ip address 192.168.1.1 255.255.255.0
no shut
Activate the connection to Router2
int s0/0/1
ip address 223.200.100.9 255.255.255.252
clock rate 64000
no shut
Activate the connection to Router 3
int s0/0/0
ip address 223.200.100.1 255.255.255.252
no shut
exit
Configure EIGRP
router eigrp 10
network 192.168.1.0 0.0.0255
network 223.200.100.0 0.0.0.3
network 223.200.100.8 0.0.0.3
end
Save the configuration
copy run start
Router 2
Activate the connection to PC2
en
config t
int g0/0
ip address 192.168.2.1 255.255.255.0
no shut
Activate the connection to Router 1
int s0/0/1
ip address 223.200.100.10 255.255.255.252
no shut
Activate the connection to Router 3
int s0/0/0
ip address 223.200.100.6 255.255.255.252
no shut
exit
Configure EIGRP
router eigrp 10
network 192.168.2.0 0.0.0.255
network 223.200.100.8 0.0.0.3
network 223.200.100.4 0.0.0.3
end
Save the configuration
copy run start
Router 3
Activate the connection to PC3
en
config t
int g0/0
ip address 192.168.3.1 255.255.255.0
no shut
Activate the connection to Router 1
int s0/0/0
ip address 223.200.100.2 255.255.255.252
clock rate 64000
no shut
Activate the connection to Router 2
int s0/0/1
ip address 223.200.100.5 255.255.255.252
clock rate 64000
no shut
exit
Configure EIGRP
router eigrp 10
network 192.168.3.0 0.0.0.255
network 223.200.100.0 0.0.0.3
network 223.200.100.4 0.0.0.3
end
Save the configuration
copy run start
If you want to see sample configuration in packet tracer, please click here to download pkt file.
(Note: you need to give ip address, subnet mask and default gateway to the hosts)